This post may contain affiliate links.
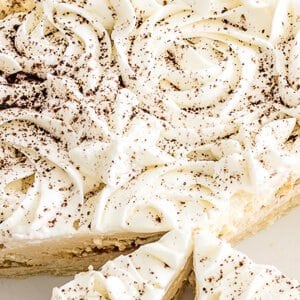
Layers of sweet mascarpone cream with ladyfingers, fresh whipped cream all in an tasty pie crust, our pie game just got set up a notch with this Tiramisu Pie!

Tiramisu is one of my families all-time favorite desserts, I thought it would be fun to turn the staple Italian dessert into a pie! Yep, a Tiramisu Pie!
HERE IS WHAT OUR READERS ARE SAYING:
“Wow what a great idea to make a Tiramisu into a pie! Very clever I would love to try to make it.” -Shiho
This Creamy Tiramisu Pie combines all the delicious flavors of traditional tiramisu—coffee, mascarpone, and cocoa powder—into a delightful pie that’s perfect for any occasion.
It’s like having a slice of Italy right at your dinner table! You’ll love it from the first bite.
The layers of sweet mascarpone cream with ladyfingers and fresh whipped cream all nestled in a tasty pie crust make this dessert truly special.
If you are a fan of the regular layered Tiramisu, just you watch out because this recipe is coming in hot and you’re going to love it!
Plus, it’s easier to make than you might think. The pie filling is just about the tastiest thing I’ve ever had. And that’s saying a lot!
So, if you’re ready to impress your friends and family with a dessert that’s both fancy and fun, let’s dive into this delicious recipe for Tiramisu Pie!
Some of our other favorite PIE recipes we have on our site include: Creamy No-Bake Lemon Cream Pie Recipe, Best Easy Banana Cream Pie Recipe, & No Bake Strawberry Jello Pie Recipe.
WHY THIS RECIPE WORKS:
- Everything in this recipe is homemade.
- You can substitute a pre made crust for this recipe.
- You can double the recipe and save some for later. Or maybe a deep-dish tiramisu pie!
INGREDIENTS NEEDED (SCROLL TO THE BOTTOM OF THIS POST FOR THE FULL RECIPE CARD):
Pie Crust
- Heavy cream
- Large egg
- Vanilla bean paste or vanilla extract
- All-purpose flour
- Powdered sugar
- Kosher salt
- Unsalted butter, cubed
Mascarpone Filling
- Mascarpone cheese
- Heavy cream
- Powdered sugar
- Vanilla bean paste or vanilla extract
- Coffee extract
Stabilized Whipped Cream
- Heavy whipping cream
- Powdered sugar
- Cornstarch
- Vanilla bean paste or vanilla extract
Pie Assembly
- Ladyfingers
- Marsala wine
- Coffee extract
- Cocoa powder (for garnish)

HOW TO MAKE TIRAMISU PIE:
- First, in a small bowl whisk together the cream, egg, and vanilla until combined, set aside.
- In the bowl of the food processor add the flour, sugar, and salt. Pulse a few times to combine.
- Add the cubed butter 1/3 at a time, pulse between additions so it doesn’t all stick together. Pulse a few times until the butter chunks are about pea-sized. Scrape sides and bottom as needed to ensure no extra large butter pieces.
- Slowly stream in the cream mixture and pulse until a ball forms.
- Turn out dough onto a large piece of plastic wrap that has been lightly dusted with flour.
- Form into a circle that is about 1 inch thick. Wrap in plastic wrap and place in the fridge for at least one hour. You can make the dough up to two days in advance.
- Preheat the oven to 400°F degrees.
- Roll out the dough on a lightly floured surface to about 10-11 inches in diameter.
- Place dough into a greased 9-inch pie dish, pressing the dough into the bottom and up the sides. Cut off any excess dough. Place in the fridge for 10 minutes.
- Using parchment paper or foil, line the dough and then add pie weights (If you don’t have pie weights, you can use uncooked rice or dried beans.) Bake for 10 minutes, remove weights and parchment paper or foil carefully, prick a few holes on the bottom of the crust.
- Reduce oven temperature to 350 degrees. Place crust back in the oven and bake an additional 5-10 minutes or until crust is lightly golden brown.
- Let cool completely on a wired rack.
Creamy Mascarpone Filling
- While the crust is cooling, make the filling by placing the mascarpone into a medium-sized bowl.
- Using a hand mixer whip on high for 1 minute until smooth.
- About 1 tablespoon at a time, add in the heavy cream and whip until smooth.
- Add the sugar, vanilla, and coffee extract and whip until smooth one more minute.
Stabilized Whipped Cream
- In a large bowl, add the heavy cream, with a hand mixer whip on high until soft peaks are formed.
- Add the powdered sugar and cornstarch a little at a time, whip between additions.
- Add the vanilla and whip until medium to stiff peaks form, do not overmix or you will have butter.
Pie Assembly
- Mix together the Marsala wine and 1 teaspoon coffee extract in a shallow bowl.
- Place half of the mascarpone filling to the bottom of the pie crust and smooth out.
- Break the ladyfingers in half and dip the bottom into the Marsala mixture.
- Place on top of the filling, I placed them in a circle around the outside with one in the middle. With the remaining Marsala mixture, brush it on top of each cookie so it is all absorbed.
- Cover cookies with the remaining mascarpone filling. Place in the fridge for two hours to set.
- Top with whipped cream. You can pipe it on like I did in the photos or just smooth it on top.
- Sift on a small amount of cocoa powder, serve.

FREQUENTLY ASKED QUESTIONS ABOUT THIS RECIPE:
WHAT’S IN A TIRAMISU PIE?
My tiramisu turned pie recipe consists of a baked pie crust, homemade ladyfingers dipped in Marsala wine and coffee extract, sweetened mascarpone cream filling, stabilized whipped cream, and garnished with cocoa powder.
That isn’t a whole lot of step needed to make this delicious pie, and trust me, you’re going to need this pie in your life.
Tiramisu in my opinion is amazing all year long.
WHAT IS TIRAMISU MADE OUT OF?
Authentic tiramisu recipes are made from layers of a cream made from eggs (traditionally egg yolk), sugar and mascarpone cheese.
Ladyfinger cookies, coffee or espresso, and cocoa powder are also authentic tiramisu ingredients.


HOW TO MAKE REGULAR TIRAMISU:
Using the above items, they are made into layers. The ladyfingers are dipped in coffee layered between the mascarpone cream and topped with cocoa powder for a traditional tiramisu recipe.
This recipe gives us the flavors of traditional tiramisu but with a fun twist, also there is no egg in this recipe.
I have used Marsala wine which is often used in tiramisu desserts but you can also make tiramisu with no alcohol, substituting strong brewed coffee or espresso in its place.
WHY DID MY MASCARPONE CURDLE ?
If mascarpone is whipped too much it will easily curdle, this happens because of its high-fat content.
My mascarpone filling curdled almost instantly but I was able to turn it smooth again over a double boiler.
HOW TO FIX CURDLED MASCARPONE?
If your mascarpone breaks while making this filling, here is how to fix it:
- Still make the filling the same way, add all the ingredients. When everything is mixed together, place a small pot on the stove with 3 inches of water.
- Bring the water to a simmer over medium-low heat. Place bowl with filling on top, whisk constantly until there is no more lumps and the filling is smooth, this takes about 5 minutes.
- Place the bowl on the counter until the filling comes back to room temperature. Whip it by hand a few times and it is ready to use.

HOW TO STORE:
This has to be stored in the refrigerator otherwise it will spoil, the best way is to wrap your pie plate in plastic wrap or aluminum foil and it should keep in the refrigerator for 2-3 days.
This can also be frozen, wrap tightly with plastic wrap and aluminum foil and it should keep for up to 3-4 weeks in the freezer, let defrost in the refrigerator before serving.
DANA’S TIPS AND TRICKS:
- Use a store-bought pie crust and blind bake it per the instructions on the packaging. Or, you can make a graham cracker crust by pulsing 12 graham crackers in the food processor (or buy graham crumbs, and use 1 1/2 cups!) add 6 tablespoons melted unsalted butter and mix to combine. Press into a greased 9-inch pie dish and refrigerate for one hour to set.
- For the filling, some options can be to mix whipped mascarpone with one package whipped topping. Or, whip cream cheese until smooth and add prepared instant vanilla pudding!
- If you can’t find ladyfingers or you don’t have time to make them, in place you can use golden Oreos, shortbread cookies, sponge cake slices, pound cake, or angel food cake!
- Top everything off with more whipped topping and cocoa powder.
- Make sure you let this set up at least 2 hours in the refrigerator so the lady fingers are able to soak up the marsala wine and the pie to set up completely.
- This can be frozen, see my tips above!

Want a fun and delicious dessert recipe that takes a classic and turns it into something else?
You need to make this delicious Tiramisu Pie!
If you like this recipe, you might also like:
If you’ve tried this TIRAMISU PIE let me know in the comments how it turned out! You can follow me over on PINTEREST, INSTAGRAM OR FACEBOOK to find some more of our mouthwatering recipes!
Still filling out the menu? Readers love pairing this one with our white chocolate raspberry tart, crack pie, mini trifles, and tiramisu cheesecake. And when you are planning next week’s dinners, our strawberry hand pies, caramel apple dip, butterscotch pie, and pistachio cheesecake keep the same easy comfort going. Still filling out the menu? Readers love pairing this one with our cannoli pie, tiramisu french toast, and apple cranberry pie.

Easy Creamy Tiramisu Pie Recipe
Ingredients
Pie Crust
- 2 tablespoons heavy cream cold
- 1 large egg
- 1/2 teaspoon vanilla bean paste or vanilla extract
- 1 1/3 cup all-purpose flour
- 1/2 cup powdered sugar
- 1/2 teaspoon kosher salt
- 1/2 cup unsalted butter cubed, (1 stick)
Mascarpone Filling*
- 8 ounces mascarpone room temperature
- 1/2 cup heavy cream room temperature
- 1/4 cup powdered sugar
- 1/2 teaspoon vanilla bean paste or vanilla extract
- 1 teaspoon coffee extract
Stabilized Whipped Cream
- 1 cup heavy whipping cream
- 2 tablespoons powdered sugar
- 1 1/2 teaspoon cornstarch
- 1/2 teaspoon vanilla bean paste or vanilla extract
Pie Assembly
- 5 ladyfingers
- 1/4 cup Marsala wine
- 1 teaspoon coffee extract
- cocoa powder for garnish
Instructions
- First, in a small bowl whisk together the cream, egg, and vanilla until combined, set aside.2 tablespoons heavy cream, 1 large egg, 1/2 teaspoon vanilla bean paste
- In the bowl of the food processor add the flour, sugar, and salt. Pulse a few times to combine.1 1/3 cup all-purpose flour, 1/2 cup powdered sugar, 1/2 teaspoon kosher salt
- Add the cubed butter 1/3 at a time, pulse between additions so it doesn’t all stick together. Pulse a few times until the butter chunks are about pea-sized. Scrape sides and bottom as needed to ensure no extra large butter pieces.1/2 cup unsalted butter
- Slowly stream in the cream mixture and pulse until a ball forms.
- Turn out dough onto a large piece of plastic wrap that has been lightly dusted with flour.
- Form into a circle that is about 1 inch thick. Wrap in plastic wrap and place in the fridge for at least one hour. You can make the dough up to two days in advance.
- Preheat the oven to 400°F degrees.
- Roll out the dough on a lightly floured surface to about 10-11 inches in diameter.
- Place dough into a greased 9-inch pie dish, pressing the dough into the bottom and up the sides. Cut off any excess dough. Place in the fridge for 10 minutes.
- Using parchment paper or foil, line the dough and then add pie weights (If you don’t have pie weights, you can use uncooked rice or dried beans.) Bake for 10 minutes, remove weights and parchment paper or foil carefully, prick a few holes on the bottom of the crust.
- Reduce oven temperature to 350 degrees. Place crust back in the oven and bake an additional 5-10 minutes or until crust is lightly golden brown.
- Let cool completely on a wired rack.
Creamy Mascarpone Filling
- While the crust is cooling, make the filling by placing the mascarpone into a medium-sized bowl.8 ounces mascarpone
- Using a hand mixer whip on high for 1 minute until smooth.
- About 1 tablespoon at a time, add in the heavy cream and whip until smooth.1/2 cup heavy cream
- Add the sugar, vanilla, and coffee extract and whip until smooth one more minute.1/4 cup powdered sugar, 1/2 teaspoon vanilla bean paste, 1 teaspoon coffee extract
Stabilized Whipped Cream
- In a large bowl, add the heavy cream, with a hand mixer whip on high until soft peaks are formed.1 cup heavy whipping cream
- Add the powdered sugar and cornstarch a little at a time, whip between additions.2 tablespoons powdered sugar, 1 1/2 teaspoon cornstarch
- Add the vanilla and whip until medium to stiff peaks form, do not overmix or you will have butter.1/2 teaspoon vanilla bean paste
Pie Assembly
- Mix together the Marsala wine and 1 teaspoon coffee extract in a shallow bowl.1/4 cup Marsala wine, 1 teaspoon coffee extract
- Place half of the mascarpone filling to the bottom of the pie crust and smooth out.
- Break the ladyfingers in half and dip the bottom into the Marsala mixture.5 ladyfingers
- Place on top of the filling, I placed them in a circle around the outside with one in the middle. With the remaining Marsala mixture, brush it on top of each cookie so it is all absorbed.
- Cover cookies with the remaining mascarpone filling. Place in the fridge for two hours to set.
- Top with whipped cream. You can pipe it on like I did in the photos or just smooth it on top.
- Sift on a small amount of cocoa powder, serve.cocoa powder
Notes
- Mascarpone curdles extremely easily. If this happens to you, don’t panic! Still mix everything together. Then place a small pot on the stove with 3 inches water. Let the water come to a simmer over medium-low heat. Place bowl on top and whisk constantly until all lumps are gone and the mixture is smooth. Place on the counter and let come to room temperature. Whip a few times before using, now you’re ready to assemble your pie!
- Use a store-bought pie crust and blind bake it per the instructions on the packaging. Or, you can make a graham cracker crust by pulsing 12 graham crackers in the food processor (or buy graham crumbs, and use 1 1/2 cups!) add 6 tablespoons melted unsalted butter and mix to combine. Press into a greased 9-inch pie dish and refrigerate for one hour to set.
- For the filling, some options can be to mix whipped mascarpone with one package whipped topping. Or, whip cream cheese until smooth and add prepared instant vanilla pudding!
- If you can’t find ladyfingers or you don’t have time to make them, in place you can use golden Oreos, shortbread cookies, sponge cake slices, pound cake, or angel food cake!
- Top everything off with more whipped topping and cocoa powder.
- Make sure you let this set up at least 2 hours in the refrigerator so the lady fingers are able to soak up the marsala wine and the pie to set up completely.
- This can be frozen, see my tips above!
Nutrition
Love This Recipe?
Follow @ThisSillyGirlsKitchen on Instagram and @danadevolk on Pinterest for more!
For a different creamy spoon dessert that uses pantry staples, our Rice Pudding with Cooked Rice turns last night’s leftover rice into a cozy 30 minute treat.
Layer this tiramisu pie with our homemade Lady Finger Cookies Recipe.


Most definitely! I would then omit the coffee extract.
Good day, Dana,
I have one question: could I replace the Marsala wine with 1/4 brewed coffee?
Thank you!
Wow what a great idea to make a Tiramisu into a pie! Very clever I would love to try to make it.
Tiramisu Pie??! This is amazing. Such a delicious, elegant transformation of this classic dessert!