This post may contain affiliate links.
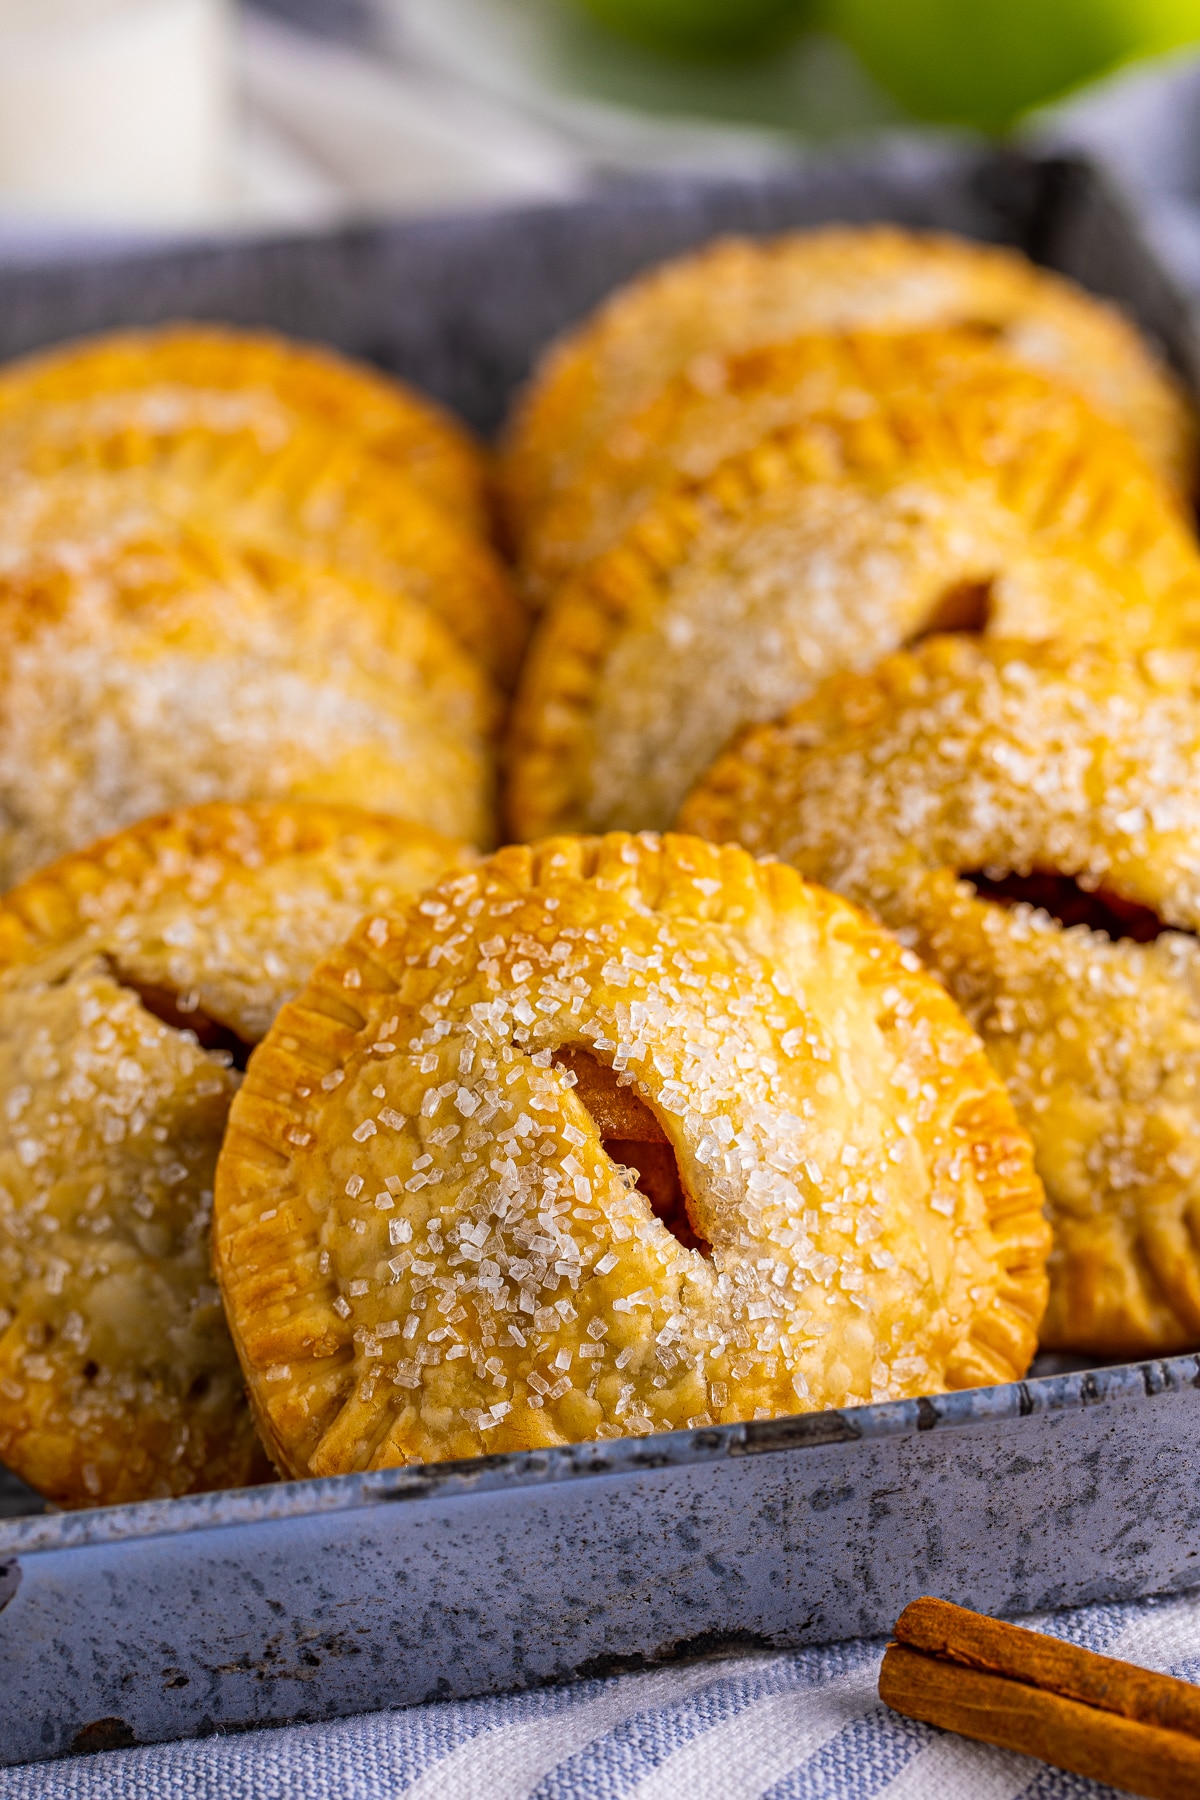
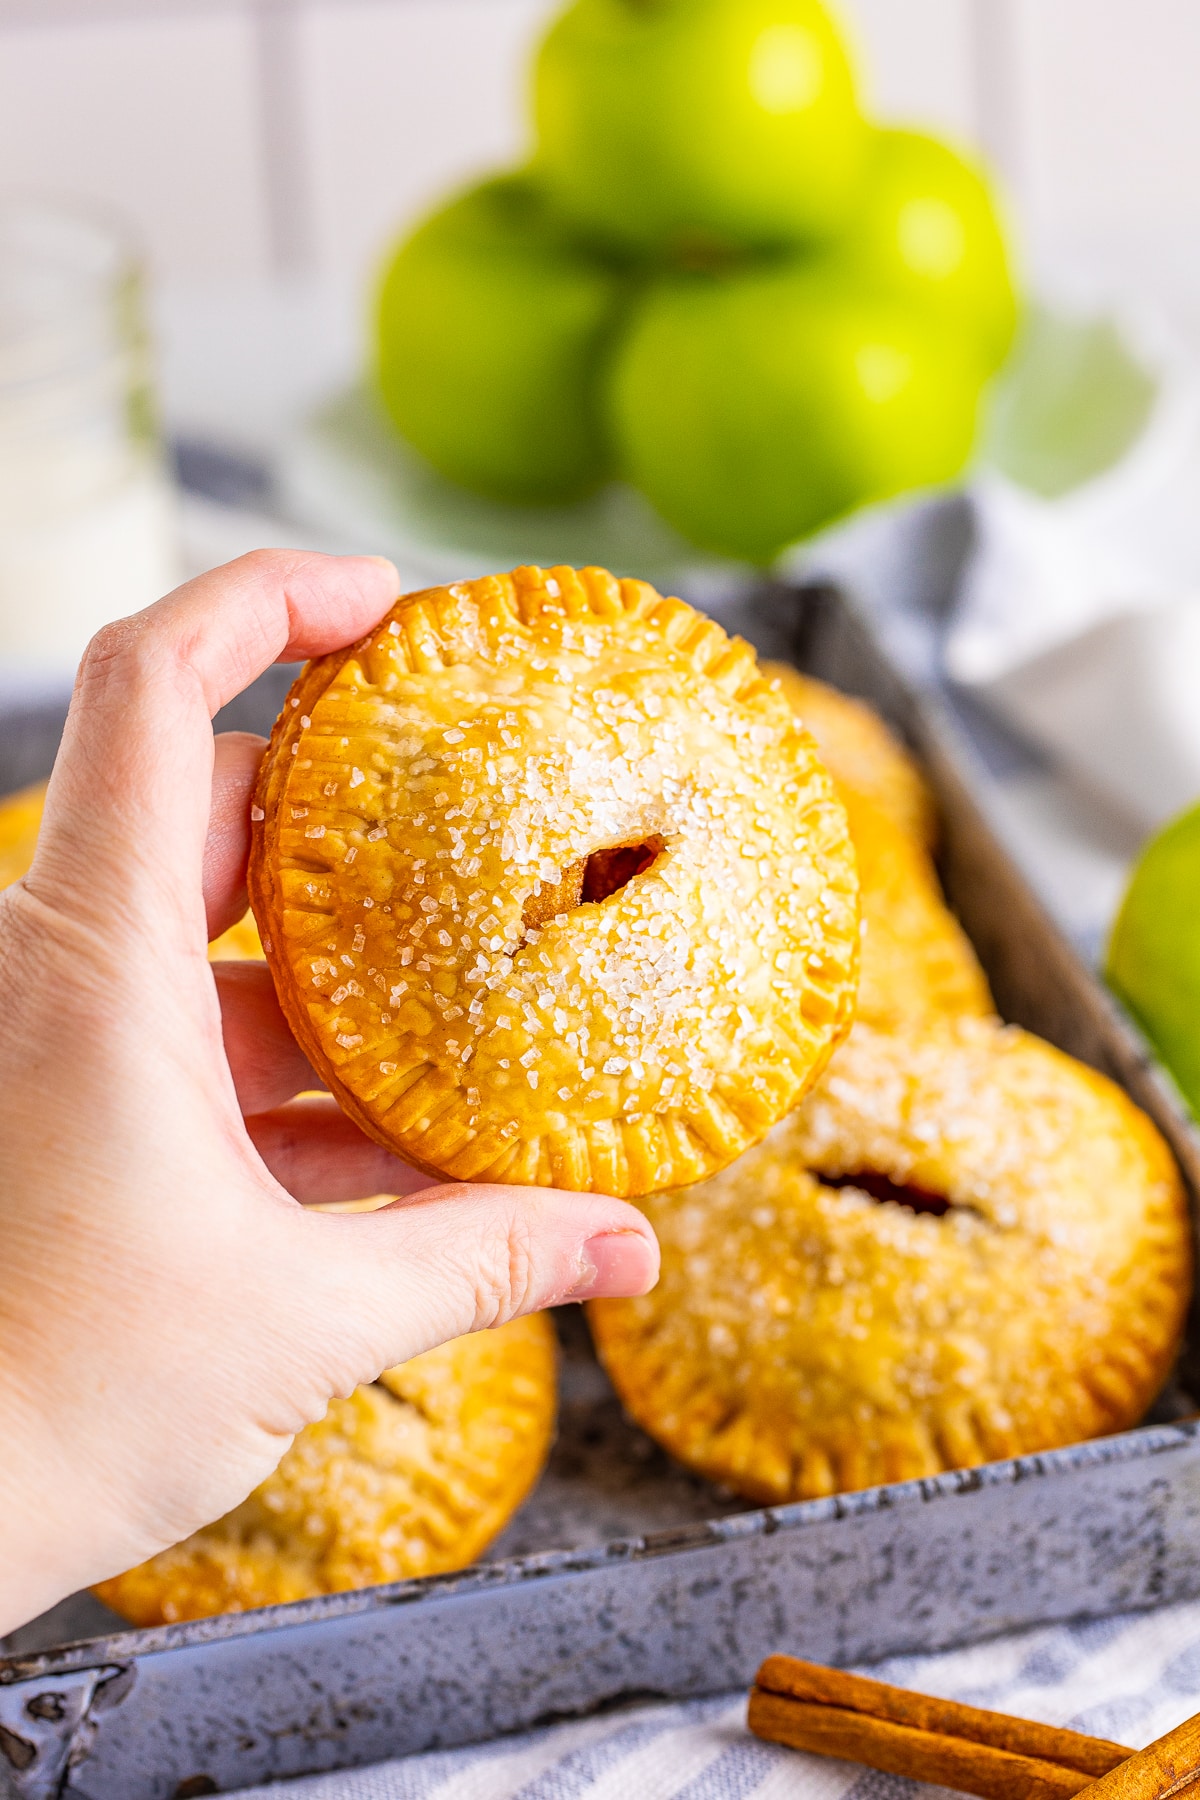
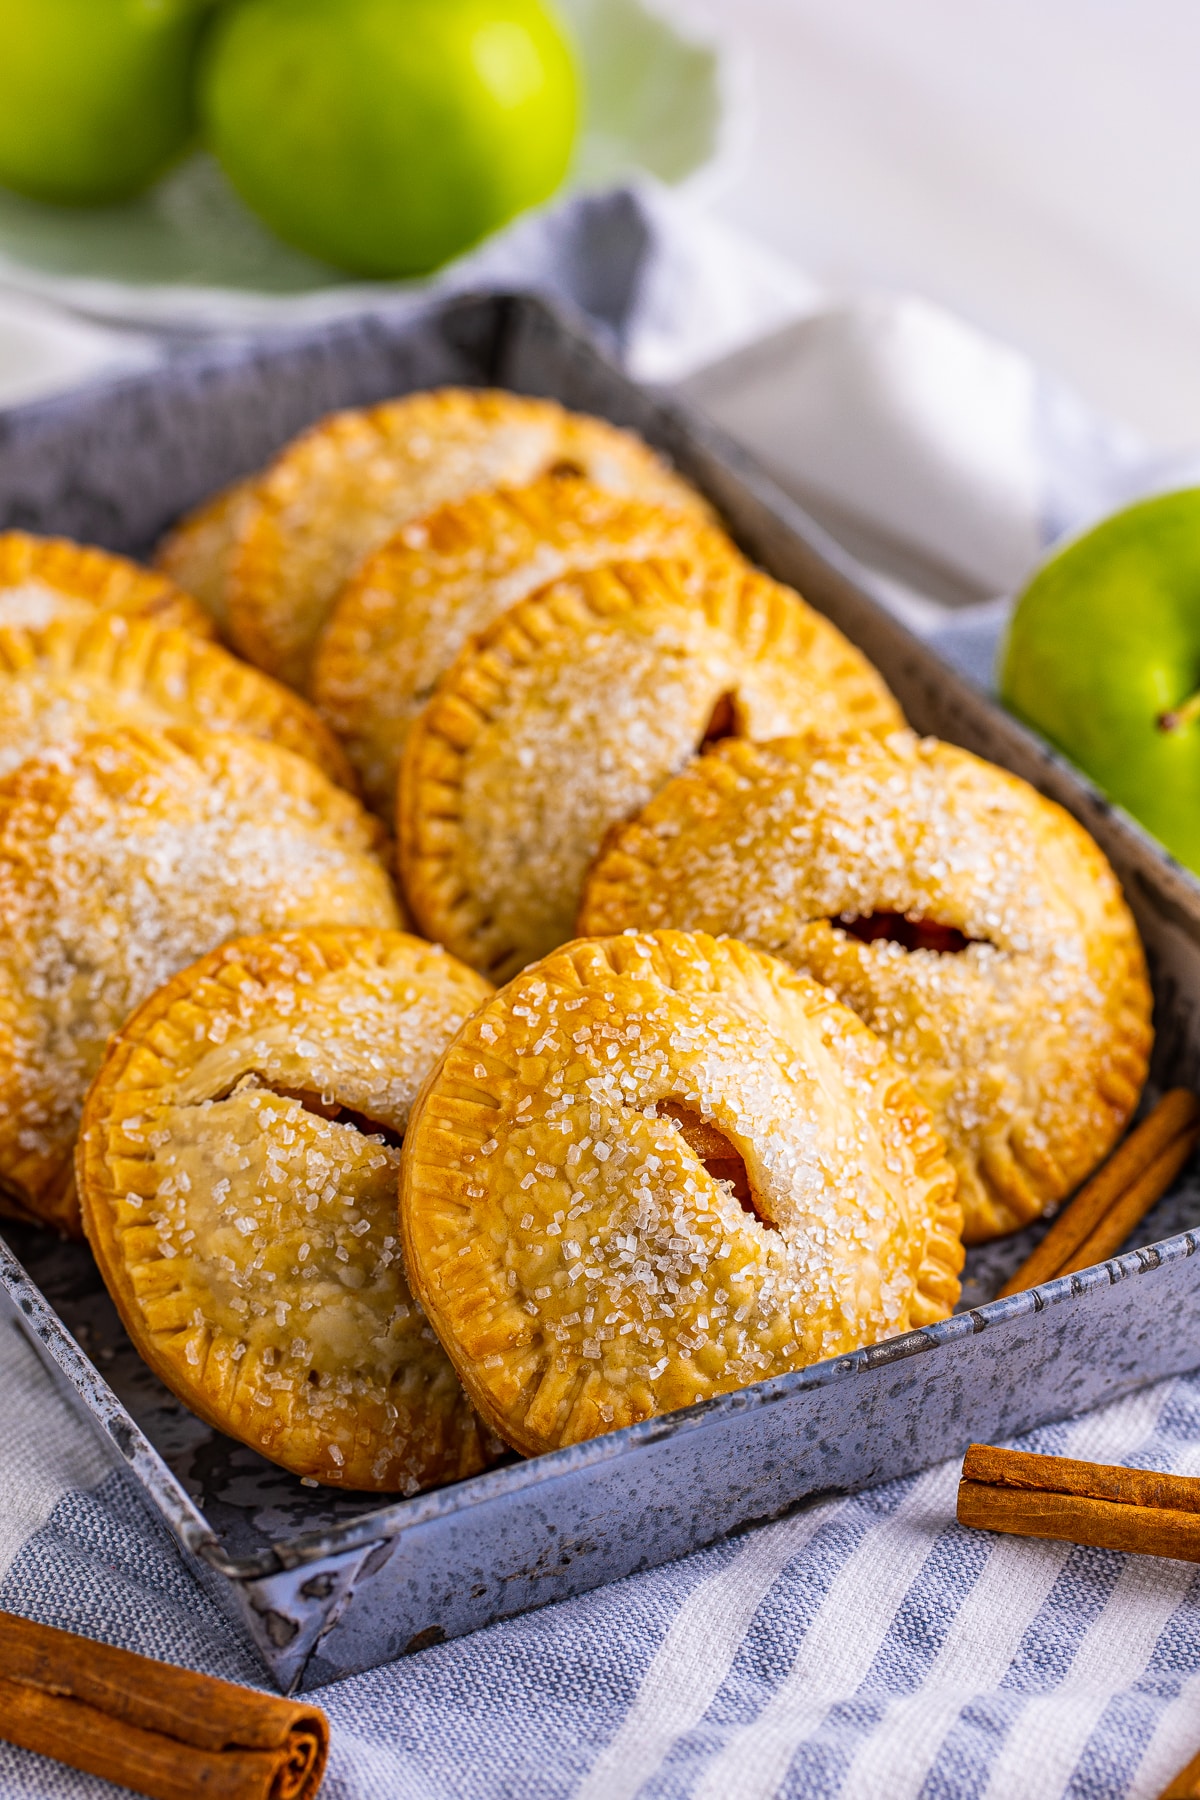
Hand-held and the perfect single-serving dessert, these Apple Hand Pies are a fun fall treat to use up all those apples that you have. Tasty, easy, and fun for the whole family.
When Fall starts to roll around, I’m all about everything apple. It is one of my favorite fruits to bake with because there is just so much that you can do with it.
These Apple Hand Pies are one of my favorite easy recipes. It doesn’t take many ingredients, and they are ready in a flash!
Also, they are a great single-serving dessert that aren’t too big but just the right size. Especially if you are craving apple pie but want something on a smaller scale and with less work.
These are done from start to finish in about 45 minutes, and they are fun for adults and kids alike. Perfect to have around for breakfast or dessert.
If you are a fan of apples but aren’t quite sure what you want to make – then I suggest that you make this Apple Hand Pie Recipe, you will fall in love.
Some of my other favorite apple recipes that we have on our site include: Apple Banana Oat Muffins, Baked Apples and Apple Cinnamon Cream Cheese Roll Ups.
WHY THIS RECIPE WORKS:
- Minimal and easy-to-find ingredients help these come together quickly.
- You can easily double the batch to make more.
- Super easy, especially when you are craving pie but don’t want to go through all the work.
INGREDIENTS NEEDED (FULL RECIPE BELOW):
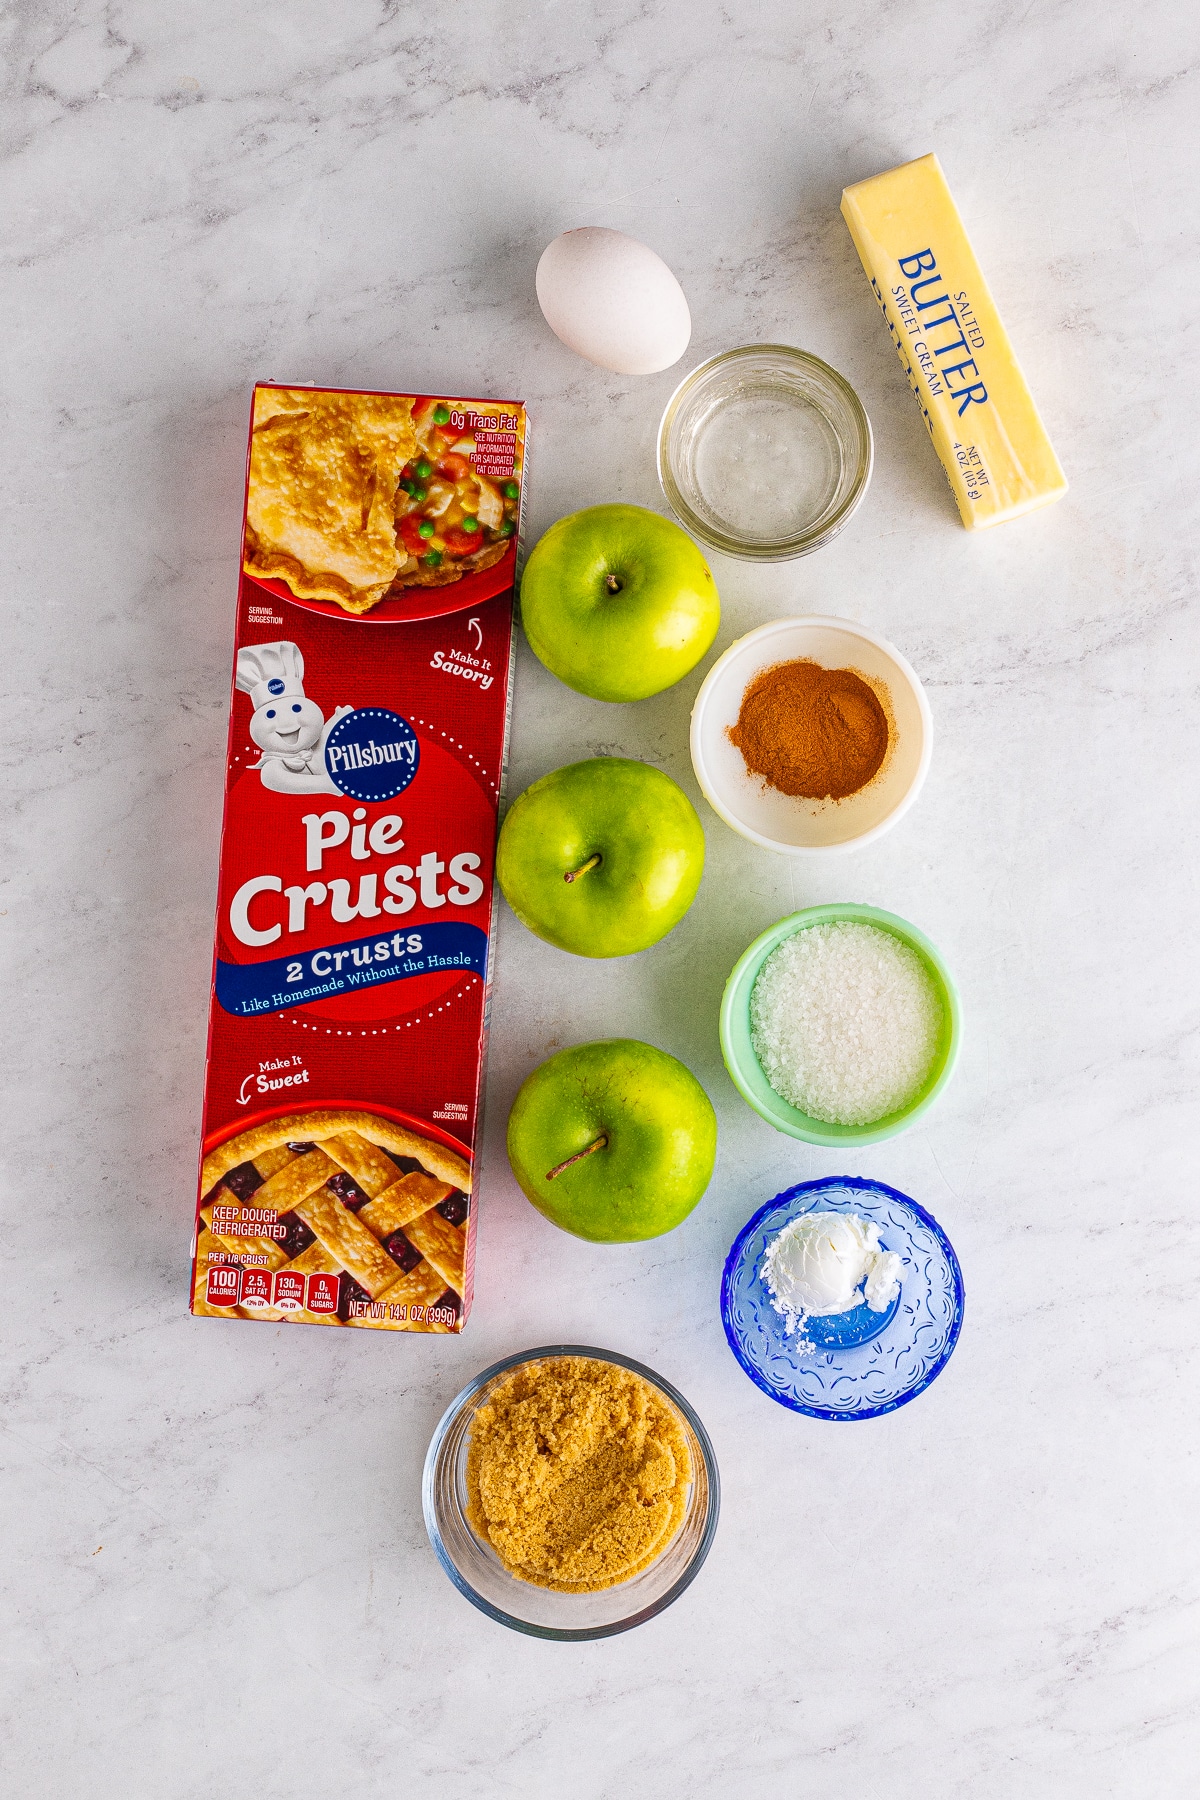
Salted butter
Light brown sugar
Ground cinnamon
Apples
Water
Cornstarch
Refrigerated pie crusts
Egg
Water
Decorators sugar
HOW TO MAKE APPLE HAND PIES:
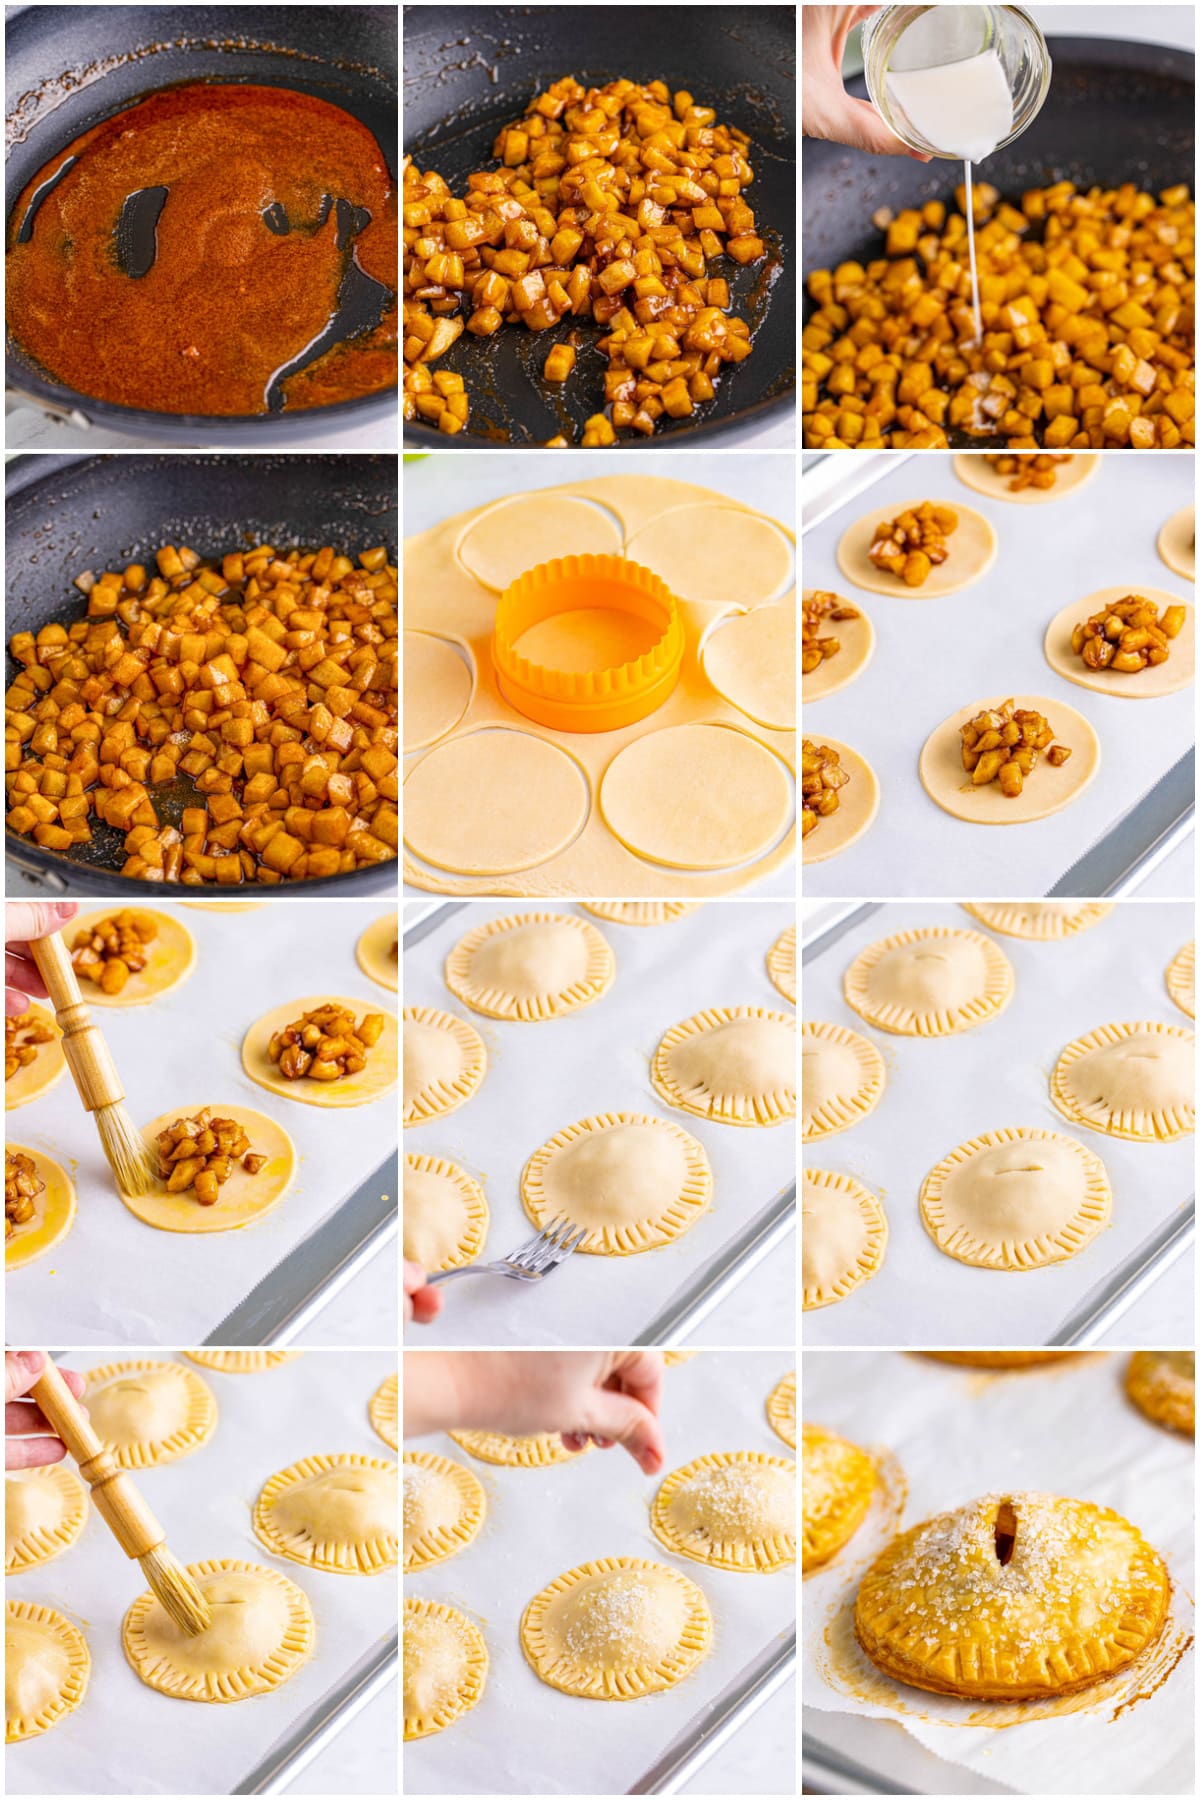
- Preheat the oven to 375°F. Line two sheet trays with parchment paper, set aside.
- In a large skillet over medium-low heat add the butter, brown sugar, and cinnamon. Stirring constantly, melt the butter, and dissolve the sugar.
- Add the diced apples to the skillet and coat in the butter/sugar mixture. Bring to a simmer and simmer for 5-8 minutes until the apples are tender-crisp, stirring occasionally.
- While the apples are simmering in a small bowl whisk together the water and cornstarch. Once the apples are tender-crisp, stream in the cornstarch slurry while stirring constantly. Cook for 1 more minute, stirring constantly until thickened, take off the heat.
- Unroll a pie crust and cut out 7 circles using a 3 & ½ inch round cookie cutter. Place the circles onto one of the sheet trays not touching. Cut out 7 circles from another pie crust and set aside.
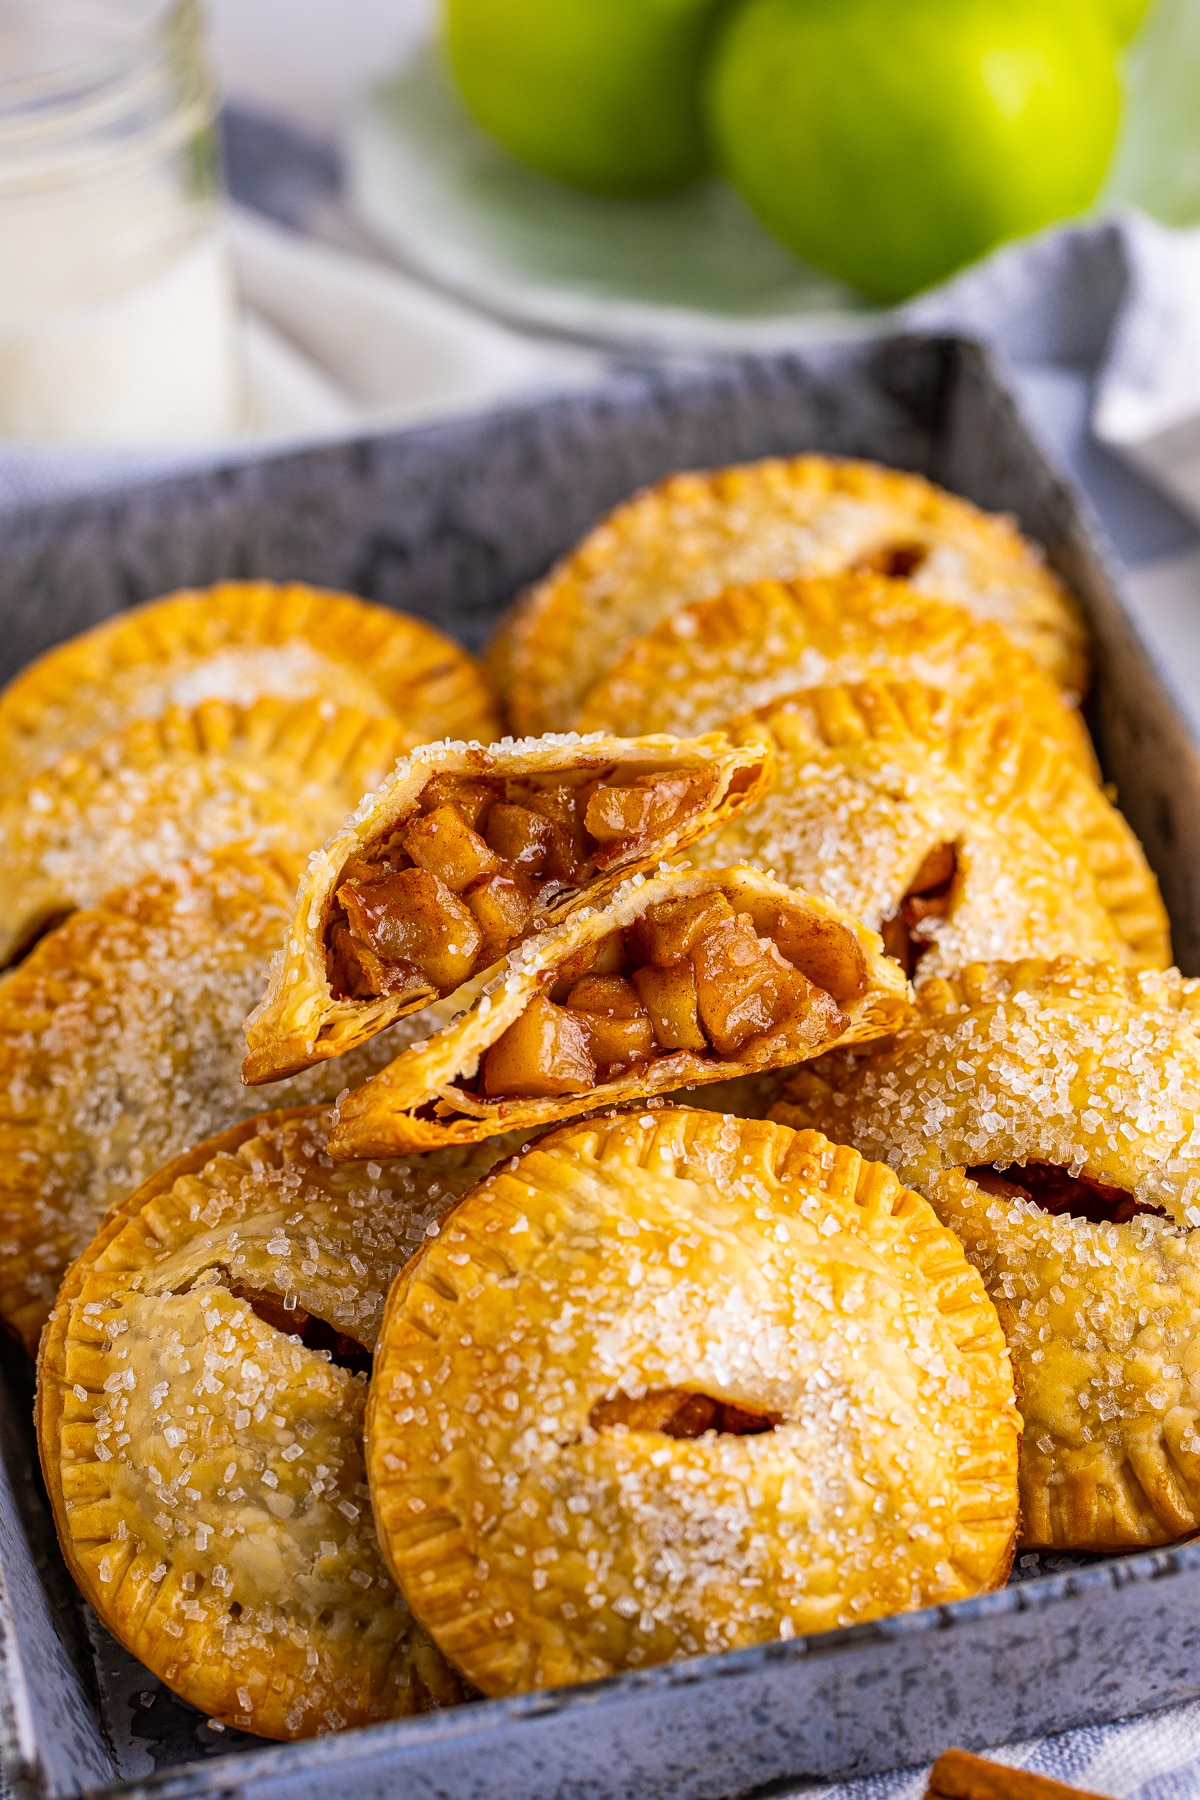
- Add about 2 tablespoons of the pie filling to the center of each of the pie crusts on the sheet tray.
- In a small bowl beat together the egg and water. Brush the egg wash along the outer edge of the pie crust. Place another pie crust on top of each one and use a fork to seal the edges together.
- Cut one slit into the top of each pie for a vent hole. Brush the entire top of the pies with the egg wash. Sprinkle with decorator’s sugar. Bake for 20-23 minutes until golden brown. Repeat with the remaining ingredients.
- Let them cool for 10 minutes on the sheet tray then move to a wire rack to cool completely. Serve warm or at room temperature.
WHAT ARE THE BEST APPLES TO USE?
We personally like to use Granny Smith apples for this recipe, they are a great baking apple and our default when it comes to anything apple-related.
Some other apple choices that you can use include: Braeburn, Golden Delicious, Honeycrisp, Jonagold, and Pink Lady.
CAN I MAKE MY OWN HOMEMADE PIE CRUST?
Yes, absolutely, we use 4 refrigerated pie crusts for this recipe, so if you are going to make your own, you will want to make sure that you will have enough for 4 9-inch pie crusts.
WHAT ELSE CAN I TOP THESE WITH?
We really like the simple decorator’s sugar on top as it makes it nice and sweet but not overly sweet. You can dip these or brush them with a powdered sugar glaze as well.
These are also great topped with powdered sugar or served with some ice cream on the side.
HOW TO STORE:
These can be stored in an airtight container at room temperature, where they will keep for up to 2 days, or 5 days in the refrigerator.
They can also be frozen, place cooled hand pies in a freezer container or bag, and they will keep for up to 3 months.
To defrost, remove from the freezer and into the refrigerator until thawed. You can reheat in the microwave if you want to serve them warm.
TIPS AND TRICKS:
- You can add more spices to the filling if you like, such as nutmeg, ginger, and allspice.
- You can use pie filling if you’d like, but dice it up really small.
- Make your own homemade pie filling if you like.
- Easily double this recipe to make more to keep on hand or to save for later.
- These can be frozen, see my tips above.
- Other toppings can be used, see above for ideas.
- Other apples can be used, see above for ideas.
Love a good old apple pie but don’t want to go through all the work? Then you absolutely need these Apple Hand Pies, easy, tasty, and perfect.
If you like this recipe you might also like:
If you’ve tried these APPLE HAND PIES let me know in the comments how it turned out! You can follow me over on PINTEREST, INSTAGRAM OR FACEBOOK to find some more of our mouthwatering recipes!


Apple Hand Pies
Ingredients
For the apples:
- 2 tablespoons salted butter
- ¼ cup light brown sugar packed
- 1 ½ teaspoon ground cinnamon
- 3 medium Granny Smith apples peeled, cored, small diced
- 2 teaspoons water
- 1 ½ teaspoons cornstarch
For assembly:
- 4 refrigerated pie crusts thawed
- 1 large egg
- Splash of water
- 1 tablespoon decorators sugar
Instructions
- Preheat the oven to 375°F. Line two sheet trays with parchment paper, set aside.
- In a large skillet over medium-low heat add the butter, brown sugar, and cinnamon. Stirring constantly, melt the butter, and dissolve the sugar.
- Add the diced apples to the skillet and coat in the butter/sugar mixture. Bring to a simmer and simmer for 5-8 minutes until the apples are tender-crisp, stirring occasionally.
- While the apples are simmering in a small bowl whisk together the water and cornstarch. Once the apples are tender-crisp, stream in the cornstarch slurry while stirring constantly. Cook for 1 more minute, stirring constantly until thickened, take off the heat.
- Unroll a pie crust and cut out 7 circles using a 3 & ½ inch round cookie cutter. Place the circles onto one of the sheet trays not touching. Cut out 7 circles from another pie crust and set aside.
- Add about 2 tablespoons of the pie filling to the center of each of the pie crusts on the sheet tray.
- In a small bowl beat together the egg and water. Brush the egg wash along the outer edge of the pie crust. Place another pie crust on top of each one and use a fork to seal the edges together.
- Cut one slit into the top of each pie for a vent hole. Brush the entire top of the pies with the egg wash. Sprinkle with decorator's sugar. Bake for 20-23 minutes until golden brown. Repeat with the remaining ingredients.
- Let them cool for 10 minutes on the sheet tray then move to a wire rack to cool completely. Serve warm or at room temperature.
Notes
- You can add more spices to the filling if you like such as nutmeg, ginger and all-spice.
- You can use pie filling if you'd like, but dice it up really small.
- Make your own homemade homemade pie filling if you like.
- Easily double this recipe to make more to keep on hand or to save for later.
- These can be frozen, see my tips above.
- Other toppings can be used, see above for ideas.
- Other apples can be used, see above for ideas.
Nutrition
Love This Recipe?
Follow @ThisSillyGirlsKitchen on Instagram and @danadevolk on Pinterest for more!